Windows 10 comes with all the useful apps required accompanied by various troubleshooter for various components. Using the troubleshooter you can find and fix the issues, but sometimes conditions come when troubleshooters fail to fix the problem. In this situation what to do? Microsoft is very smart and to help out users they have baked some useful utilities into the Windows 10 operating system so that users troubleshoot the advanced issue. Windows Memory Diagnostic tool is one out of the valuable tools available in Windows 10. Windows 10 Memory Diagnostic Tool is useful when you want to examine possible memory issues that include an examination of the RAM on your computer. Apart from this, if the application installed on your PC keeps crashing, or they are not running as per your expectation, or you experiencing abnormal things like random freezes, reboots, unexpected BSOD, it is very tough to figure out what is causing the issue, but in some cases it could be a memory problem.
How to Run Windows Memory Diagnostics Tool in Windows 10
Now the question is how to figure out any memory problem in Windows 10? The answer is Memory Diagnostic Tool. In upcoming lines, you will read about how to run Windows Memory Diagnostics tool. In most of the cases when the system detects possible memory problem it automatically shows the notification regarding the issue, and when user click on it, the system automatically launches the tool. But sometimes conditions comes when you want to run Windows Memory diagnostic tool in Windows 10 manually. In this situation, you need to follow the steps mentioned in upcoming lines:
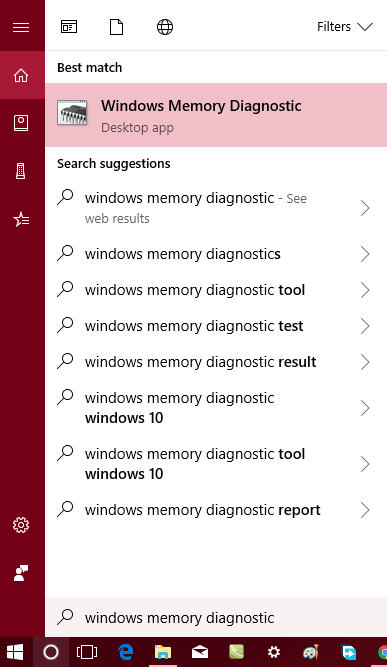
In Windows 10 Start menu search bar type “Windows Memory Diagnostics” and when the same app appears in the search results. Click to open it.
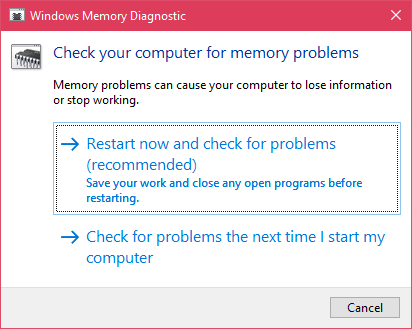
This will launch a small dialog box with two options just like shown in the following screenshot:
Here click on the option which reads “Restart now and check for problems (recommended)” Note: Before clicking on this option make sure you have saved all your outstanding work and closed all the apps. As the system will quickly reboot. 3. After a successful reboot, the system will run Windows Memory Diagnostics tool automatically. The tool will take few minutes to complete the process of computer memory examination. Once the process of memory testing is completed, the windows will automatically reboot. If Windows Memory Diagnostics tool finds out possible memory error, then it is a sign that you should call the PC manufacturer to provide you assistance to fix the issue. Mostly the errors related to system memory gives a sign of hardware problem or memory chips problems. You can also contact any local computer engineer to fix the issue for you.
Windows Memory Diagnostics tool (Advanced Options)
By default, the Windows run the tool in recommended options, but there are some advanced options available in the tools, and advanced users might want to manage those settings. To get access to advanced options in the tool, you need to press the F1 key when starts running the Windows Memory Diagnostic tool. There are following advanced options which you can adjust: Test You can select when you want to run the tool in Basic, Standard, or in the extended mode. The descriptions for all the mode available in the tool. Cache You can also choose the cache settings for the memory test. It can be Default, ON, or OFF. PSS Count In case, you want to repeat the memory test, then just type the number of your choice, and tool performs the test again and again until it reaches that number. For example, you type 3 it will perform the memory test 3 times. Once you have done with above settings, simply press F10 keyboard keys to start the memory test. So this is how you can Run Windows Memory Diagnostics Tool in Windows 10. Why don’t you try these easy steps to find out any memory related issue? I hope you find this article useful.


