Most users faced this kind of issue after upgrading their laptop/ PC to Microsoft’s new Windows 11 OS. Now, there can be a multitude of reasons why the Cisco AnyConnect client would not work or respond in Windows 11. These include the inability of the Cisco AnyConnect client to connect to its respective VPN server, misconfigured VPN settings in Windows 11, connectivity issues, and many others. So, if you are someone who is facing issues with the Cisco AnyConnect client on your Windows 11 device, this guide will surely help you. In this article, we have listed a few methods to fix the Cisco AnyConnect client not working in Windows 11 issue. Read the article till the end to know how you can fix the Cisco AnyConnect client in Windows 11 and get it up and running again.
Fix Cisco AnyConnect in Windows 11 in 2022
Now, below we have listed a few methods that you can try when the Cisco AnyConnect client stops working on your Windows 11 device. However, before you move on to those, it is worth mentioning that if you have any VPN client other the Cisco AnyConnect, it might interfere with the Cisco AnyConnect client and prevent it from properly functioning on your Windows 11 laptop or PC. Hence, before moving on to the troubleshooting methods listed below, make sure you disable the other VPN client on your device and try running the Cisco AnyConnect client. If that fix works, you won’t be needing the fixes listed below. On the contrary, move on to the following fixes for the Cisco AnyConnect client not working issue.
1. Allow Cisco AnyConnect Through Windows Firewall
Now, when the Cisco AnyConnect VPN client stops working on your Windows 11 PC, especially after an update, the first thing you should try is to check whether the Cisco app is allowed in Windows Defender settings. You see, after a Windows update, many of your system settings and preferences might be switched to default, including Windows Firewall settings. In this case, third-party apps like Cisco AnyConnect might get disallowed for free traffic through Windows Firewall, meaning that when the program tried to operate, Windows Defender will prevent it to do so. Hence, before making changes to the Cisco client, make sure it is allowed through Windows Firewall. To do that, follow the steps right below.
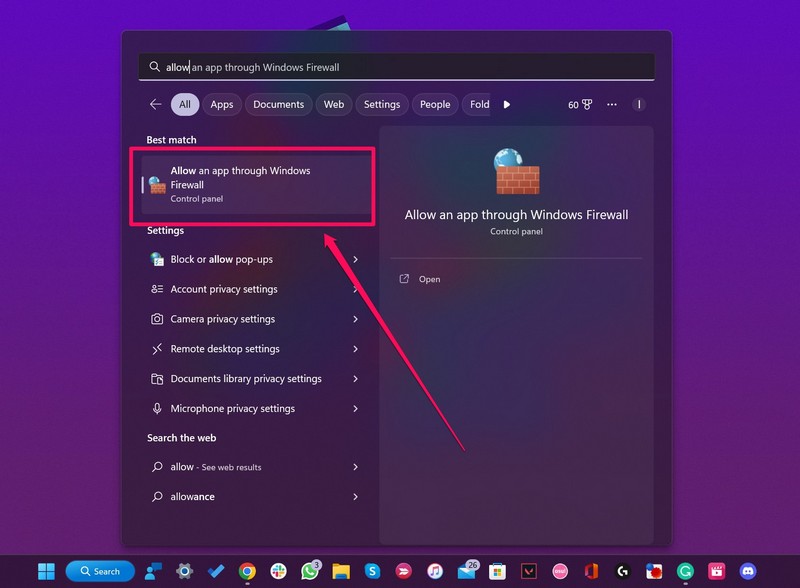
- Click the search bar/ icon on your Windows 11 Taskbar and search for “allow an app.”
- Click the Allow an app through Windows Firewall option that shows in the search results.
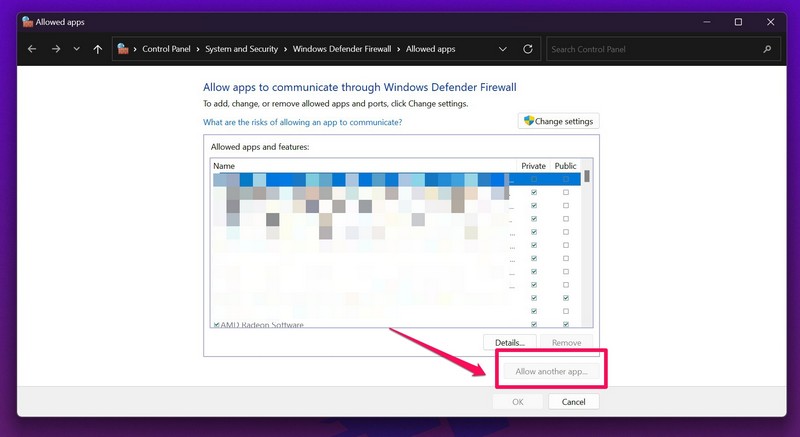
- In the following window, make sure the Cisco VPN is on the list of allowed apps and is checked.
- If it is not added, click the Allow another app button and add Cisco VPN.
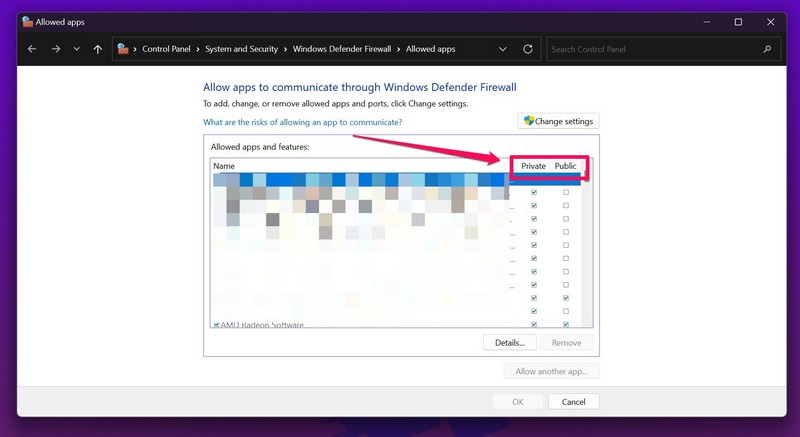
- Also, make sure that the checkboxes for both Private and Public are checked for Cisco VPN. After you add the Cisco AnyConnect client to the allowed list for Windows Firewall, try opening the client on your Windows 11 PC. If the Windows Firewall was preventing the program to run on your device, it should work fine now. If, however, it does not, move on to the next fix.
2. Repair Cisco AnyConnect Client in Windows 11
If allowing the Cisco AnyConnect client through Windows Firewall did not resolve the issue, you can try repairing the installation of the program from the Control Panel in Windows 11. The steps to repair the installation of the Cisco client in Windows 11 are fairly easy and it works like a charm in most cases as it eliminates minor issues in the client and restores its functionalities. So, to repair the Cisco AnyConnect client installation in Windows 11, use the following steps:
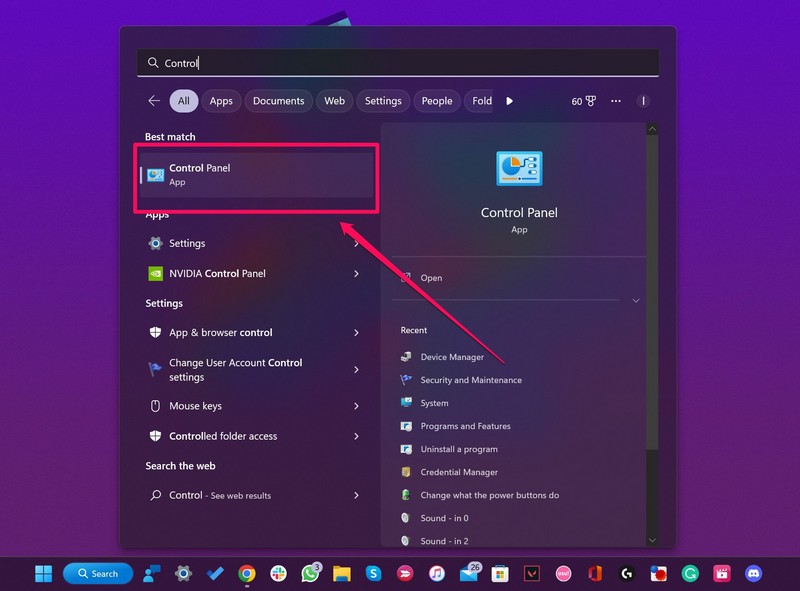
- Use Windows search to search for Control Panel and click it to open.
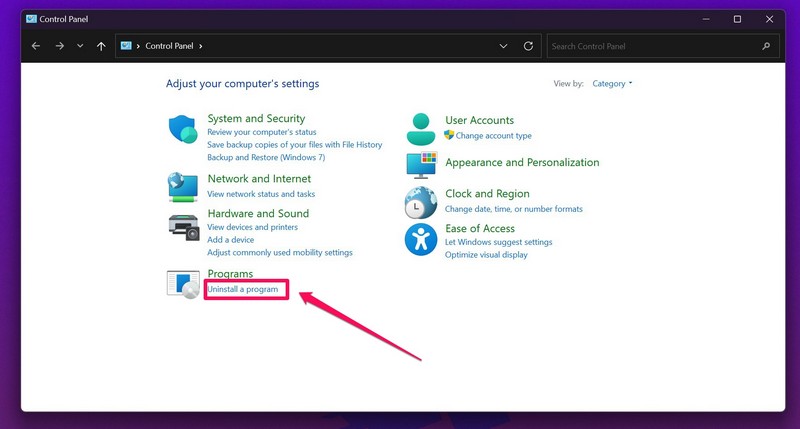
- Click the Uninstall a program option under the Programs settings in Control Panel.
- In the following window, find Cisco AnyConnect VPN on the list and click to select.
- Now, click the Repair button that appears above and follow the on-screen instructions to repair the installation. Following the repair, it is better to restart your Windows 11 PC or laptop before opening the Cisco client. This fix works in most cases and resolves the issues with the Cisco AnyConnect client to restore its functionalities in Windows 11.
3. Update Virtual Network Adapter in Windows 11
Now, if the above two fixes failed to resolve the issues in the Cisco AnyConnect client in Windows 11, updating its virtual network adapter might be of some help. Much like other high-end VPN solutions in the market, Cisco AnyConnect also comes with a specific virtual network adapter that aids the client’s operations in Windows. Hence, an outdated virtual network adapter is another common cause that might prevent the Cisco AnyConnect client to run in Windows 11. In this case, you can update the virtual network adapter in Windows 11 from the Device Manager of your PC or laptop. To do that, follow the steps right below:
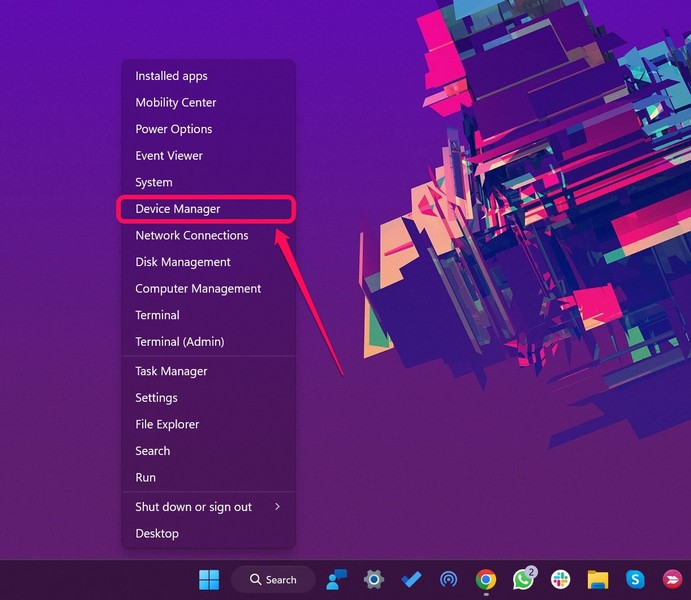
- Right-click on the Start button to open the Quick Links menu.
- From this list, select Device Manager.
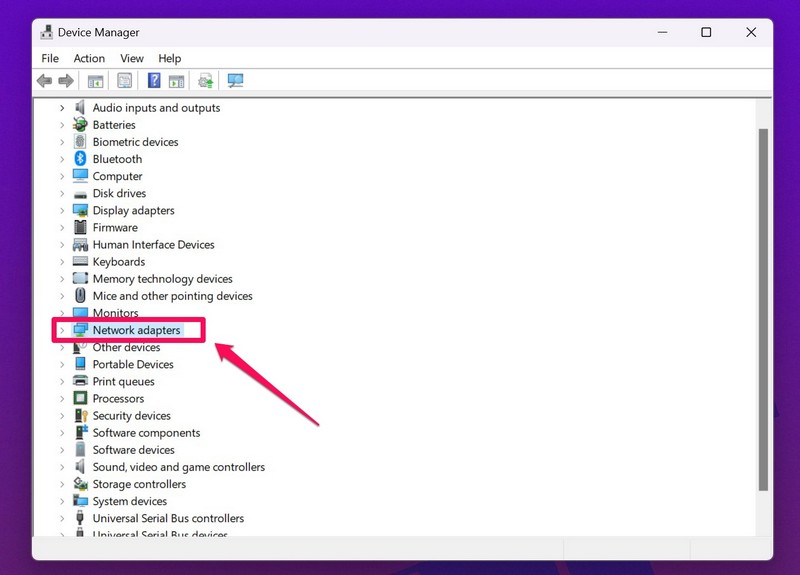
- Now, click the arrow button beside the Network Adapters option on the list to expand it.
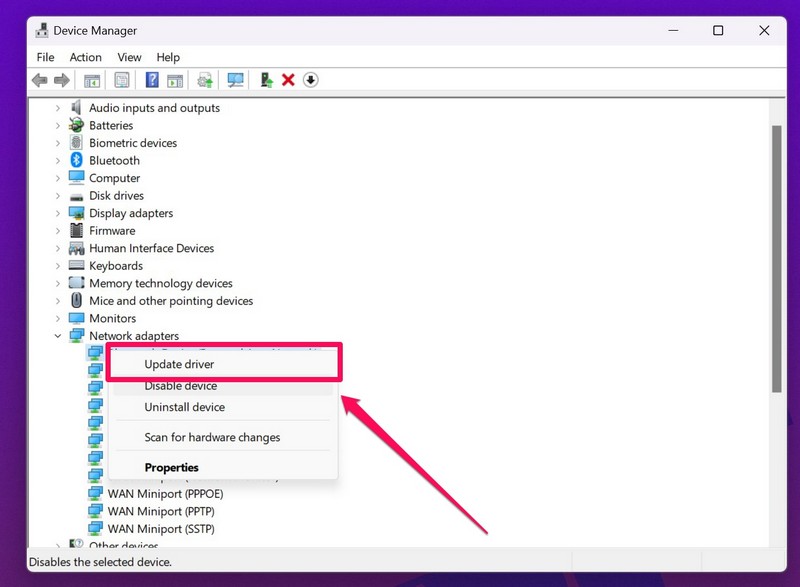
- Right-click on the Virtual Adapter option and select the Update driver button.
- Follow the on-screen instructions to complete the update and then restart your Windows 11 PC or laptop. Following the restart, try opening the Cisco AnyConnect client on your Windows 11 device. It should work just fine now, given it was an outdated virtual network adapter that was causing the issues.
4. Use Windows Registry to Repair Cisco AnyConnect in Windows 11
After trying out the above fixes on your Windows 11 laptop/ PC, if you are still stuck with a non-functional Cisco AnyConnect client, it is time to pull out the big gun and that is Windows Registry. You can use Windows Registry to repair the Cisco client in Windows 11 to resolve most issues. However, before moving on, it is worth noting that incorrect tweaks/ edits in Windows Registry might cause a system failure. Hence, proceed with caution and try to stick to the steps exactly as they are. Now, to repair the Cisco AnyConnect client using Windows Registry edit, follow the steps right below:
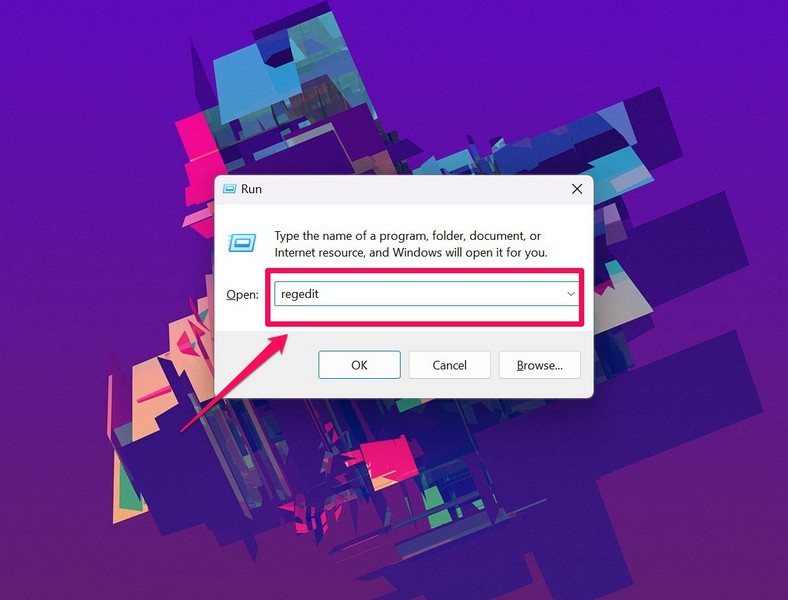
- Press the Windows + R shortcut to open the Run tool.
- Type “regedit” in the text field and press Enter to open the Windows Registry window.
- Now, copy-paste the following path in the URL text field above and press Enter:
- Right-click the DisplayName option and choose the Modify option
- Then, make sure that the Data Value section contains the following text: “Cisco Systems VPN Adapter.” Note: For 64-bit Windows, the text should be “Cisco Systems VPN Adapter for 64-bit Windows” in the Data Value section.
- Now, save the changes and exit the Windows Registry window. Following this process, try opening the Cisco AnyConnect client on your Windows 11 device. It should be fixed and function properly on your device again.
5. Clean Re-install the Cisco AnyConnect Client in Windows 11
If all of the above methods to fix the Cisco AnyConnect client in Windows 11 fail, the last thing you can do is perform a clean reinstallation of the program on your PC or laptop. A clean re-install refers to the process of completely uninstalling a program on your PC, including saved files and data, and reinstalling it from scratch. So, as you can imagine, to perform a clean re-install, you must first perform a clean uninstallation of the Cisco AnyConnect client in Windows 11. To do that, follow the steps right below.
- Open Control Panel on your Windows 11 PC or laptop from the Start Menu or by using Windows search.
- Click the Uninstall a program option under Programs.
- Find the Cisco AnyConnect Mobility Client on the list and select it.
- Click the Uninstall button above to uninstall the program.
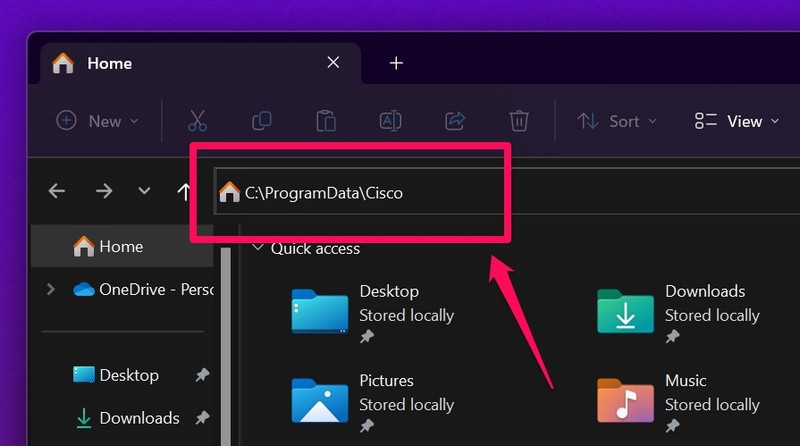
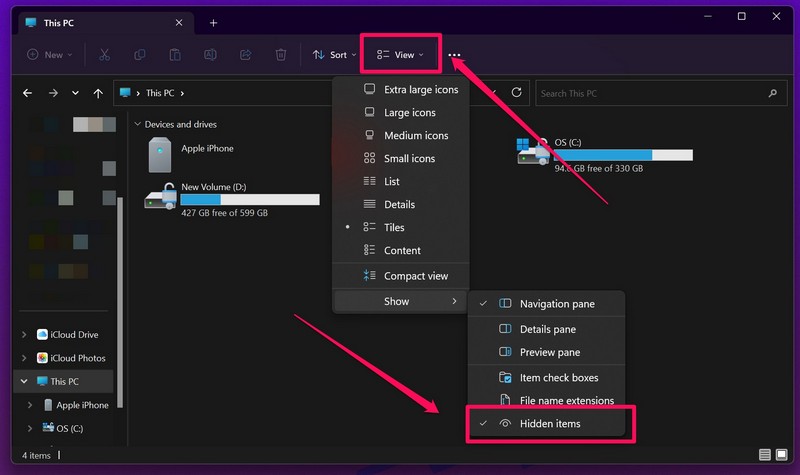
- Now, open File Explorer and copy-paste the following path in the URL locator above: Note: The ProgramData folder, which we are looking for, might be hidden here. So be sure to check the box for Hidden items under the View -> Show drop-down menu.
- In the ProgramData folder, select the Cisco AnyConnect Mobility Client folder and press Shift + Del to permanently delete the folder along with the data.
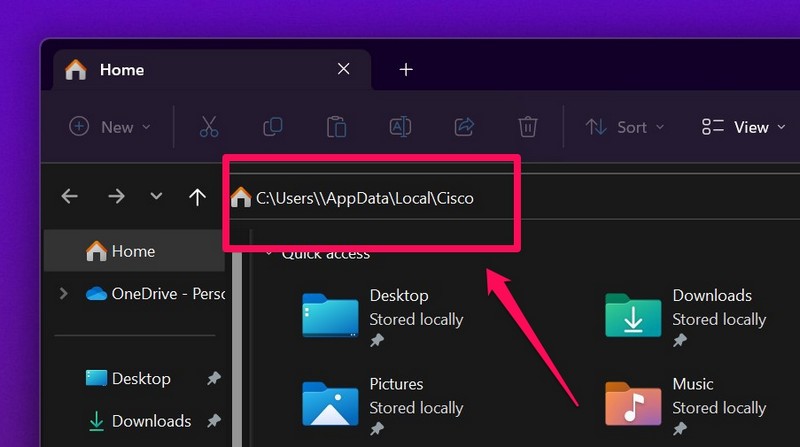
- Next, go to the following path using the URL bar in File Explorer and do the same:
- Following the deletions, restart your Windows 11 laptop/ PC.
- Now, go to this link and download the Cisco AnyConnect client installation file.
- Run the Cisco AnyConnect Mobility Client setup file on your Windows 11 PC and follow the on-screen instructions to install the program from scratch. Following the clean reinstallation process, the Cisco AnyConnect client should start working on your Windows 11 laptop or PC.
Is Cisco AnyConnect compatible with Windows 11?
Previous versions of the Cisco AnyConnect Mobility client might not work with Windows 11. So, if you face any compatibility issues with Cisco AnyConnect after upgrading to Windows 11, you might need to downgrade your OS or upgrade the Cisco AnyConnect client to the latest version.
Why is Cisco AnyConnect not running on my Windows 11 laptop?
There can be a plethora of reasons why the Cisco AnyConnect Mobility client is not working on your Windows 11 device, including misconfigured Windows Defender settings, minor issues in the installation files of the Cisco AnyConnect client, and many others.
How to use Windows VPN instead of Cisco AnyConnect in Windows 11?
If you already have the Cisco AnyConnect VPN client installed on your Windows 11 device, unfortunately, it will not be possible to replace the Cisco client with a standard Windows VPN on your device.
Wrapping Up
So, this was all about some of the best fixes that you can try when the Cisco AnyConnect VPN client stops working in Windows 11. We hope one of the above methods helps you resolve the issue with the VPN program and get it up and running on your device again. However, if all the listed fixes fail for you, you can refer to the official troubleshooting guide for the Cisco AnyConnect Mobility client from right here. You can also check out other Windows-related guides on our platform and let us know what we should cover next in the comments. We’ll see you at the next one.
