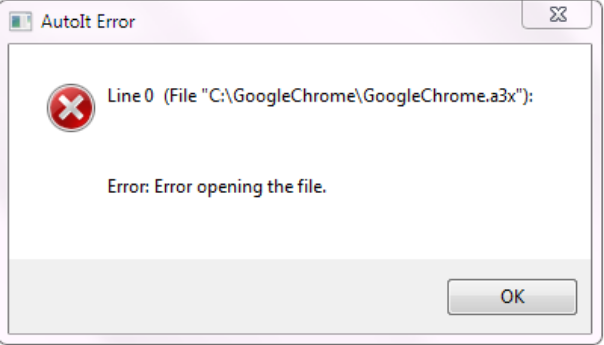
If you use AutoIT and are looking for a solution to remove this error on startup, you’re at the right place. This post will elaborate on the reasons why you are seeing the error message on every system boot. Moreover, you will learn about 6 easy steps to fix the AutoIT error on your system.
What is AutoIT?
AutoIT is a freeware programming language that can create automation scripts. This programming language can help in automating Windows GUI. AutoIt uses the combination of simulated keystrokes, mouse movement, and window manipulation. Because of all these simulated actions, it is a tool to perform user interface testing.
Causes of AutoIt Error on Windows 10/11
These are all the probable causes for the AutoIt Error on Windows 10/11:
Your system contains malware.AutoIT system files are corrupt.You have enabled some AutoIT scripts to run on startup.Windows is missing important system files.
Fix AutoIt Error on Windows 10/11
Here are the 6 easy methods to Fix AutoIt Error on Windows 10/11.
1. Run a Virus Scan
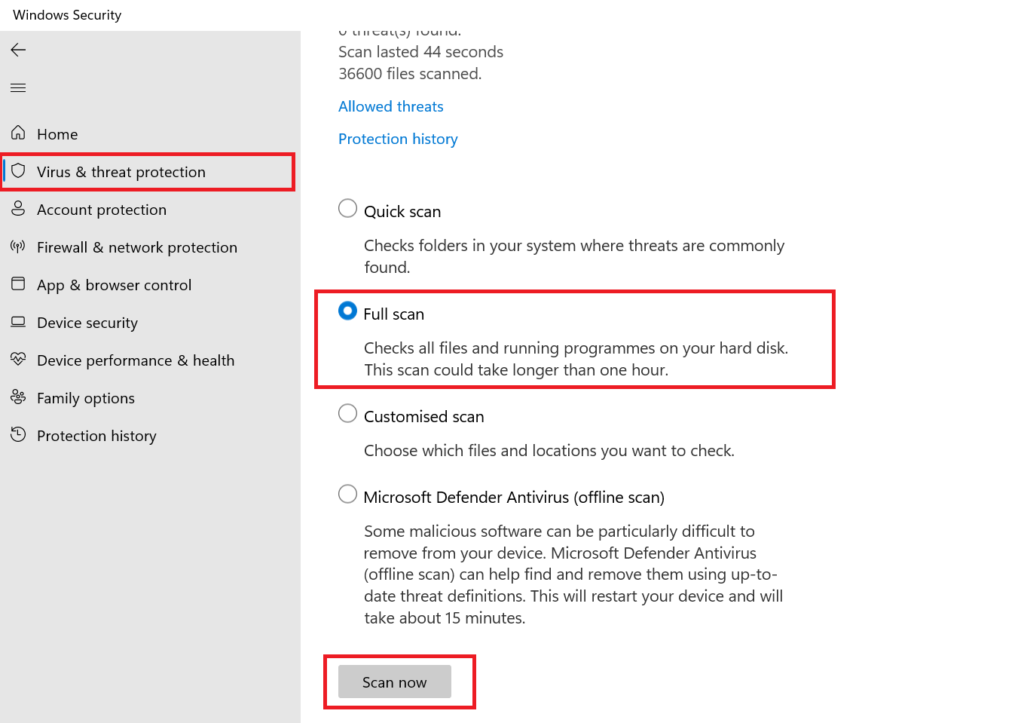
The AutoIT error can sometimes pop up due to existing malware in your system. This malware can masquerade as an AutoIT script and pose risk to your system. So, it is advisable to conduct a deep virus scan on your PC. Windows Defender is an inbuilt antivirus program in Windows OS. You can use that or opt for a trial version of reliable antivirus software like Avast. We will showcase steps to run a deep scan for malware using Windows Defender. Step 1: Press Win Key + I to launch the Settings app on your PC. Step 2: Now, navigate to the left-hand menu and click on the Privacy and Security option. Step 3: Then click on the Windows security>Open Windows Security option to launch the app. Step 4: Move to the left-hand side menu and select the Virus and Threat protection option. Step 5: Click on the Scan Options on the page to expand the list. Then click on the Full Scan radio button and then click on Scan Now. Now, sit back and let it scan the system to find traces of malware if any. Remove the identified threats and then restart your system. Check if the AutoIT error still pops up.
2. Delete AutoIt entries using File Explorer
You can try deleting AutoIt entries using File Explorer. This process is manual and may take a lot of time to find malicious files. These files could be present inside the System 32 folder, Program Files, or any other folder. You will have to search your “C Drive” or the entire disk for these files and delete them. Here is a list of all the suspicious file names and folders that you need to delete from your system.
KHATRA.exenames.txtsvchost.comsass.exeAsk.com.exeExterminate It!.exedriver—grap.exexerox.exe cuhuCIDD_Pbycool1
3. Edit the Windows Registry
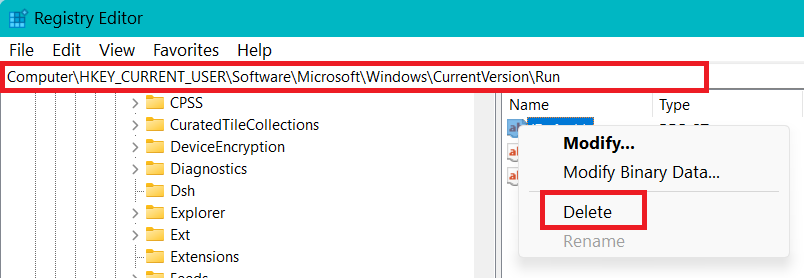
The next best method to remove the AutoIT error is by making changes to the Windows Registry. You will need to delete all the programs that autorun when Windows boots up. The Run registry key houses all the programs which must run on Startup. AutoIT may have modified your registry to autostart on every boot. You need to delete the string values from the Run key. Before proceeding with this method make sure to backup your Registry on a USB drive. Click on File > Export and then name your registry file and choose a save destination. You can restore to this version of Registry if anything goes sideways. Step 1: Press Win Key + I to launch the Run command box. Then type Regedit and press enter key. Step 2: Paste the following path in the address bar of the Registry Editor. It will take you directly to the Run key. Computer\HKEY_CURRENT_USER\Software\Microsoft\Windows\CurrentVersion\Run Step 3: In the Run Key, you need to delete all the strings with the type REG_SZ. Right-click on a string and then select Delete from the context menu. Step 4: Confirm your selection by clicking on Yes in the warning popup window. Repeat this process for all the strings with the type REG_SZ. Then exit the Registry Editor and restart your system. Check if the AutoIT error bothers you on the startup again.
4. Remove AutoIt scripts from Windows startup using Autoruns utility
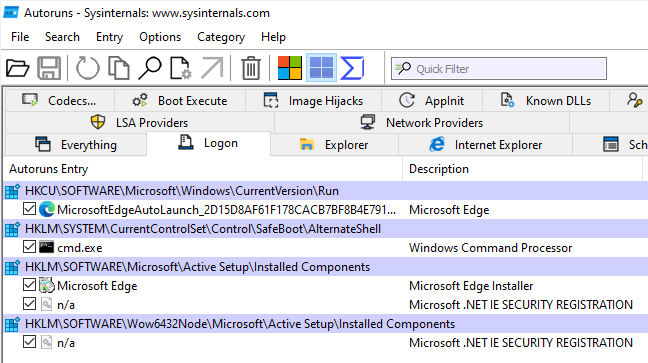
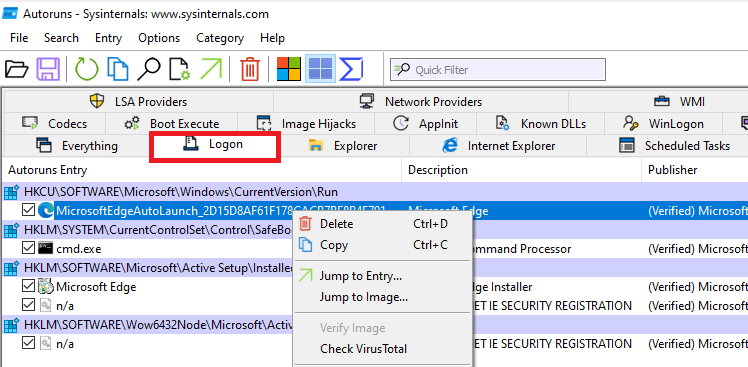
A probable cause for the AutoIT error can be some AutoIT scripts. You need to remove these scripts to fix the error and have a clean startup. Autoruns for Windows is a utility that can help you identify these scripts which run on startup. You can delete all the scripts that are the source of the AutoIT error. Step 1: Open any browser and search for Autoruns for Windows. Click on the link that points to the Microsoft page. Do not download from any other source. Step 2: Once downloaded, open the Autoruns for Windows. You don’t need to install the utility. Step 3: Now, navigate to the Logon tab in the utility and look for references to a3x and GoogleChrome. You can even search for these programs using the search bar on the top. Step 4: If you don’t find any entries, open the Everything tab and then search for a3x and Google Chrome again. Step 5: Right-click on the entry and then select the Delete option. Alternatively, you can click on an entry and press the Ctrl key + D to delete it. Repeat the process for all such suspicious entries. Then Restart your Windows computer to check if the error still exists.
5. Reinstall AutoIt
If deleting registry strings and scripts did no good, you need to reinstall AutoIT on your system. Reinstalling will remove all the old files and configurations. Moreover, the error message on the system startup will also vanish. Step 1: Press the Windows key and search for the Control Panel. Open in and then click on the Uninstall a program option. Step 2: Find the AutoIT program from the list of installed programs and right-click on it. Step 3: Choose the Uninstall option from the context menu. Step 4: Confirm your selection and then follow the on-screen prompts to uninstall the program. Step 5: Now, go to the official page of AutoIT and download the appropriate version for your Windows OS. Install it and then restart your system. Check if any error message pops up like before.
6. Reset Windows
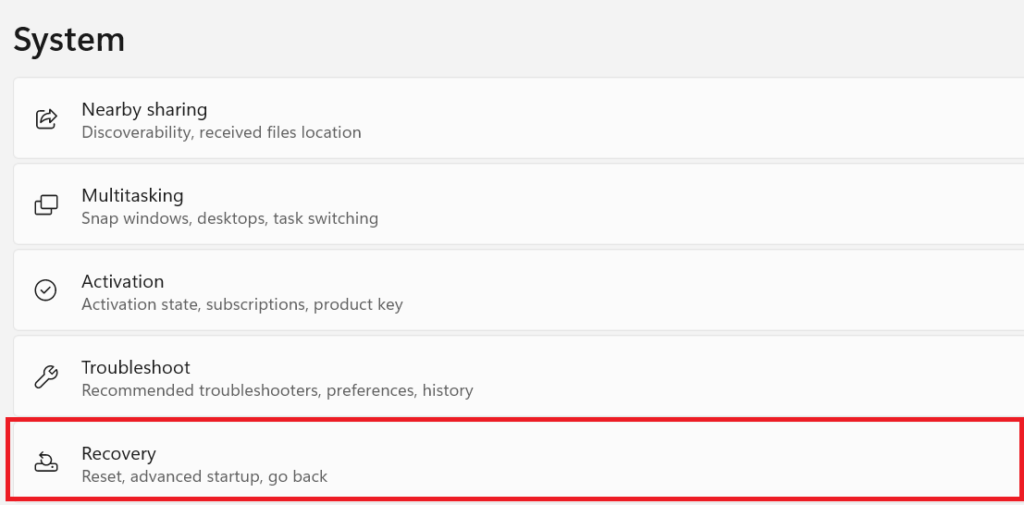
Reinstalling AutoIT must have fixed the AutoIT error. But if you still get the error message on every startup, then you need to Reset Windows. Resetting Windows will uninstall all programs and clear errors in the current build. By Resetting the Windows, you have a chance to go back to an error-free version like before. Step 1: Press Win Key + I to launch the Settings app. Then, scroll all the way down on the right-hand side, under the System menu. Step 2: Click on the Recovery option and then click on the Reset option. Step 3: You will see two options in the Reset this PC Windows: Keep my files and Remove everything. We would advise you to select the keep my files option. This way you don’t need to create a backup of your files stored on the C drive. Step 4: Proceed with the setup and reset your system. Step 5: Install the AutoIT again and then check if you get an error message on startup.
Is AutoIt a virus?
No. AutoIT is a scripting language used in interface testing. It is not a virus but certain malware can masquerade as AutoIT. So, you need to conduct a deep malware scan and manually delete all the suspicious executable files.
Is AutoIt open source?
AutoIt is an open-source automation language for Windows operating systems. You can download the software from the official site and use it to test scripts. It is completely free to download and use.
How do I install AutoIt?
Visit the official website of AutoIT and download the software. Make sure to choose the appropriate file that your Windows OS will support.
Final Words
This concludes our post on how to fix the AutoIT error on Windows 10/11. AutoIT is a useful tool for testing but the error message points to an existing problem. It could be due to malware like Veronica or due to unnecessary scripts running on startup. You need to first conduct a deep scan for malware before trying out any other methods. Always create a backup of your registry before making changes to it. Use Windows Reset as a last resort if everything else fails.
